Costuming Tips and Tricks

This is a repository of information for those making costumes from scratch. Please note, that these tips are for informational purposes only. We take no responsibility for the results, or any injuries that may result from trying them out. Try at your own risk.
Many of these tips were thought up by me and my group, but some were thiefed from the EZ-Board, or from other Marines.
Colonial Marine
BDU's.
There are 2 basic ways I've found the get accurate BDU's. One is by buying the "Safariflage" BDU's from Out In Style for $19.95 each (tops and bottoms) plus shipping, and the other is by buying regular Urban Camouflage and dying them to the right colors.
I personally went with the Safariflage BDU's, and to weather them (they just wouldn't fade!!) we just airbrushed over them with a heavily diluted bone white paint that muted the darker colors, and made the whole set look nicely broken in.
And if you want to dye them, here are the instructions. I borrowed them off the EZ Board. If you're the one that wrote this, let me know and I'll add your name to it. I've personally never tried this, so can't verify the results:
"If you can find 100% cotton Urban Cammo BDU's, you are better off. It also works with the 50/50.
Rit Dye: 2 orange, 1 green: TWICE the amount of water.
1) Remove the bottom pockets on the shirt. The added material on the sleeve can also be taken off. Modify the collar to a "Mandarin" or "Chinese" collar.
2) Wash the hell out of them. You can use RIT DYE REMOVER, about 10 packets to lighten up the colors on the cammo. The lighter the better. Be careful of bleach as it will weaken the material, especially the buttons! They make fabric safe bleach, which is ok.
3) If you want to distress them do it now.
4) Set up a tub, or whatever and mix up your dye and water solution. Wear LONG rubber gloves ( the dye will stain your skin).
5) Drop the pants and shirt into the mix, swish it around so that all the material is exposed to the dye.
6) Wash
7) Dry
8) Wear
9) Wash again when dirty"
Collar.
For the collar, which was a Mandarin styled collar, there are a few ways to convert a standard collar to be more accurate.
Sgt. Draino reccomends:
"There are a number of ways you can do this, with varying degrees of accuracy, difficulty, and cost. Prolly the EASIEST way, is to print out a picture of what it should look like, and take your BDUs to a seamstress/fitting shop, and have them alter the collar. Will cost some money, but won't kill you. At a guess, $10? One way of doing it yourself, is to carefully remove the collar you have (rip the seams out, don't muss the fabric), turn it upside-down (so it's wider on the bottom than on top), and sew it back on. You'll still need to make some minor mods to get it to fit right, though. You also really need access to a sewing machine to do it right. Alternatively, you could use Biker Scott's method. It's definitely the easiest way to do it by hand yourself, though probably not the most accurate. It all depends on how much effort or money you want to put into it."
While Biker Scott suggests:
"Just fold the points of the collar in toward your neck, and roll the collar inside so it's about an inch high. You want it to stand up. And sew.... "
Armor Weathering.
To make my armor look really beat up, first, wet down the armor, then break a piece of charcoal and sprinkle the coal all over the armor. Use a paper towel or your fingers to mash up the coal and to spread it out so it looks like the armor is filthy and covered in dust and gunpowder residue. Use a paper towel to wipe up some of the coal and to even out coloring. When you have the effect that you want, cover the armor with a coating of Dull Coat spray paint and you're all set. This technique can also be used on your Pulse Rifles and any other prop that needs to look grimy.
Realistic Camera Lens.
So you have the helmet, but it has a resin cast camera lens. Want it to look more realistic? Here's a great idea from Liquid Phoenix:
"I used a clear plastic disk (used for glass bumpers, it's the thin one) found at a hadware store. Use some super glue around the edge and place in camera. Now you have an all new great looking lens for around a $1.00."
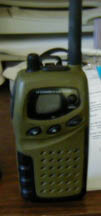
Working Microphones.
To add a working mike to your Marine helmet, pick up an AudioVox FR-140 B Radio from Target or Wal-Mart or somewhere ($30), then pick up an earbud PTT (Push To Talk) mike from Radio Shack ($20). We chose the 140 B because it's cheap, it's small, and, in addition to the 14 regular channels that other radios have, this model has 38 privacy channels on each of the 14 regular channels giving you a total of 532 channels. And since more and more people are using these types or radios at Conventions, you can be pretty sure that if you only had 14 channels to choose from, they'll all be taken by other Con folk. Remember, I painted mine OD green. The radio comes molded in blue/green clear plastic.
You can either make this a permanent attachment, or make it removable. To make it removable, drill out the center of the mike boom on the Marine helmet so it fits the clip on the end of the PTT mike. Slip the mike in and run the wire up the mike arm to the earflap. Tape it down with some electrical tape. Hang the earbud off the liner straps so it stays inside the ear cushion. Now just run the wire to the radio. If you attach the radio inside the helmet lobster plates, the entire unit is in one place, and you won't have to worry about undoing wires when you want to take off your helmet (thanks, Sgt. Draino).I used a US Army issue First Aid pouch, removed the belt clip on the radio, punched holes in the pouch's flap for the antenna, wire, and on/off switch.
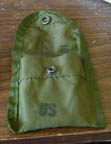
You can Velcro the pouch in place, or glue it, or even rivet it, depending on your needs. Works great.
To make the mike permanent, remove the clip on the PTT end, bore out the helmet mike a little more until the PTT mike fits all the way into the mike head. Cut out the bottom of the mike head so the PTT button is accessible. (Pictures coming soon to make this easier to understand)
And another thing, if you're going to use a radio with your Marine armor, take the time to paint the damned thing OD green!!!!!
Working Shoulder Lamps.
If you picked up a Shoulder Lamp kit and want to wire it to work, head to Radio Shack and pick up:
1 x Flashlight Lamp #213/222 #272-1124 (2)
1x AA Battery Holder #270-408
1 x Slide Switch #275-409A (2)
1 x Mini Lamp Base #272-356A
The battery will last a long time, it's the bulbs that'll burn out quick, so be sure to carry extra's.
Just bore out room in the lamp head for the mini lamp base, drill a hole out the top for the switch, and another hole out the bottom that will lead to the battery holder. I just Velcro the battery holder inside the back of the armor. You will need some basic soldering skills, and please be careful!! I have some nice solder burns that prove those damned things are hot.
If you want to add a nice effect, add in the reflective cup part from an old flashlight. It'll make the lamp brighter, and look even more real.
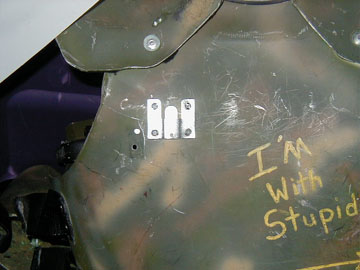
Attaching the Lamp to the Armor.
This is a new technique (thanks to Sgt. Draino). Head to Home Depot and pick up 1 Ook Security Hanger #50044

Use a piece of scrap plastic on the inside of the armor when attaching the female part to reinforce where the lamp will hang. The set comes with 8 small screws. These screws are perfect for attaching the male piece to the lamp, but you'll want to get 4 bolts and nuts, and 8 washers, for bolting the female piece to your armor. The washers go on the outside, underneath the female piece, to give it a bit more clearance from the back of the armor, so the male piece doesn't scratch it up too bad when you take the lamp on and off. Not that it matters much, as there is never a need to remove the female piece once it is attached, and any scratching being done to the armor would be concealed by the piece.
And when you paint the metal clip black, it almost looks just like the clips that were on the screen used armor.
Boots.
The boots used in the film were Vietnam issue Jungle Boots. The had an OD canvas upper and a black leather lower area. There is some discrepency as to what kind of soles, or lugs the boots had, but most Marines aren't THAT particular. Jungle boots can be acquired from just about any Army Navy store, or on the internet. The good ones run in the $100 range, but there are also really good knock-offs that go for $20. These really are the best to get since they look good, are comfy, and are really cheap.
Altama has the good ones for $75 - $100. While IMS Plus has the knock-offs for $20. But remember, almost any Army Navy store in your area will probably have them in stock, and it will save you shipping.
Patches.
The patches for your USCM BDU's will add a lot of detail and accuracy to your costume. There are a lot of places that sell the legal patches (which are sized larger than the film used versions, and are embroidered instead of screenprinted. These patches go for anywhere from $5-$10 for each patch.
Harry Harris's site has some great reference materials on what the original patches looked like, and where they were placed on the original costumes.
Some good places to get patches are - Intergalactic Trading, E-Bay (ViperForce is always selling them at a reasonable price, and don't forget to tell him that Spat sent you).
After you attach the patches, don't forget to weather them. Nothing looks more silly that a Marine in a set of really beat up armor, wearing beat up BDU's, scuffed boots, and brand spanking new looking patches! Dust the patches with some flat black spray paint from a few feet away before sewing them in place.
Painting a Pulse Rifle Tutorial
Spellbinder's great guide to making your rifle look sweet.
Flashlight How-To

Want to build a flashlight like the one above? Click the image above for a complete How-To by Sgt. Draino.